Wednesday, May 29, 2013

Cannot access Source web service error when running the start-spprofileservicefullreplication cmdlet via UPRE


It’s been frustrating from last two days to see the “Start-SPProfileServiceFullReplication: cannot access Source web service” error while executing the PowerShell cmdlet to replicate the profile properties from MOSS 2007 to SharePoint 2010. I hardly find any blog(s) which shed some light on “Cannot access source web service” error indeed I did find some blogs which explain about the destination web service error. So I feel posting an article on this topic would really be a need and could help someone who landed in a same situation.


Microsoft did explain about when and how this command can be useful here but haven’t found much documentation about prerequisites in regards to avoid getting the stated error. As one can find some of the prerequisites here but would need an additional steps to be followed/verified in order to execute the command without getting any error.

These are the steps which have been followed in my environment to get the successful replication.
1.    Make sure the source MOSS 2007 environment is up and running.
2.    Ensure to add the Full Read permissions on source web application to the account which is running the User Profile Replication Engine.
3.    The account that is used to run the User Profile Replication Engine must be a User profile service application administrator and should be granted Full control access to Shared Service Provider (SSP).
4.    Navigate to this location C:\Windows\System32\WindowsPowerShell\v1.0 and run the powershell.exe with Administrator account.
5.    Add the snap-in as single line as seen in the screen shot “Add-PSSnapin Microsoft.Office.Server.AdministrationToolkit.ReplicationEngine”

It took about 4 hour to replicate 3K properties which I think a little extra time taken, but see you get to it in less timeJ

Thanks for reading through it and keep me posted if you have any issues with it.

Thursday, February 9, 2012

Aborted due to internal error while preupgradecheck

This seems to be a common error while preupgradecheck command runs in SharePoint server. Most of the time, we don’t get an insight from preupgradecheck generated html report, but looking at preupgradecheck logs will give us some idea as what is going on behind the process.

I encountered the same error “Aborted due to internal error” for InvalidDatabaseSchema while running the pre upgrade and the logs have given some idea to proceed towards fixing the errors. I tried finding with ‘InvalidDatabaseSchema’ in the logs which says checking schemas in content database <Database name>… and immediately after this step, there was an error with [SPObjectProcessor] which indicates as below
An unexpected error occured while processing a health analysis rule. This rule will be skipped. The following message was generated by the error: System.Reflection.TargetInvocationException: Exception has been thrown by the target of an invocation. ---> System.Data.SqlClient.SqlException: CREATE DATABASE permission denied in database 'master'

This was apparently indicates that the problem is somewhere with the permissions. Then I tried getting the db_owner and security admin roles for my SharePoint farm account on SQL Server followed by running the pre upgrade check once again. Still getting the same error but this time, I did notice that the content database for ‘InvalidDatabaseSchema’ step in the logs was from Secondary SQL server. I then tried getting the same server roles on Secondary SQL server as well, followed by preupgradecheck once again; Surprised to see that the error ‘Aborted due to internal error’ is gone and Invalid Database Schema is passed.

Please note, if you have multiple SQL Servers in the farm, them ensure you have Security admin and db creator server roles on all the SQL servers before running the preupgradecheck.

If you see the same error, then try following the above and see the error goes away.

Wednesday, February 1, 2012

MySite migration over SharePoint 2010 with custom user profiles properties

MySite migration from MOSS 2007 to SharePoint 2010 would be a complex process, but I would say, it’s rather straightforward when we make a proper plan before migration of mysites. Many thanks to Mike Stevens for step by step approach, however I had to correct few of the steps for powershell cmdlets and verification check points while performing the approach at my environment. I have validated each the steps and try to illustrated the entire process in brief, so that it would help the community users to perform the steps in a seamless manner and make flatten their migration strategy.

Here we begin with,..
1.    Backup your existing MySite content database on your MOSS 2007 farm SQL Server
2.    Backup existing SSP database on MOSS 2007 farm SQL Server
3.    Move both database .BAK files to the new SQL Server( i.e. SP 2010)
4.    Restore the SSP database from .BAK as database named Profile_DB on your new SQL Server
5.    Restore the MySite database from .BAK as database named Content_MySite_DB on your new SQL Server
6.    Ensure the SP 2010 farm account has DB_Owner roles on above two restored DBs.
7.    Create a new Web Application in SharePoint 2010 to host your migrated MySite content (e.g. http://mysites)
8.    Detach the default Database from http://mysites application
9.    Attach and upgrade the restored 2007 MySite database (i.e. Content_MySite_DB) using the SharePoint 2010 Power shell

For e.g.
Mount-SPContentDatabase –Name WSS_Content_MySites –WebApplication http://mysites

10. Check and verify the Database has been upgraded successfully. Central Administration à Check Upgrade Status
If the DB upgrade status is failed, then do not proceed further. Please refer to the upgrade logs for errors and warnings. Troubleshoot them over and attached it back. Try this until you get the status as succeeded.


11. Stop  the following services in your SharePoint 2010 Central Administration site 
Central Administration à Manage Services on Server
·         User Profile Service
·         User Profile Synchronization Service
12. Delete existing User Profile Service Application, if they already exist [Central Administration à Manage Service Applications]
13. Make sure to check the box for delete associated data/content à OK
14. Reset IIS
15. Create a new User Profile Service Application in Central Administration [Central Administration –> Manage Service Applications –> New]
·         Name = “Test User Profiles”
·         Create New Application Pool
“Test Users pool”
DOMAIN\farm_account ( This account should have “Replicate Change Directory Permission on Domain Controller)
·         Profile Database
Use the restored 2007 SSP database as the “Profile Database Name” (Profile_DB)
Accept all other default database names
Enter the newly created MySite web application url (e.g. http://mysites) under My Site Host URL
16. Check and verify the SSP profile Database has been successfully upgraded with creation of User Profile Service Application. Central Administration à Check Upgrade Status
If the SSP DB upgrade status is failed, then do not proceed further. Please refer to the upgrade logs for errors and warnings. Troubleshoot it and try creating the User Profile Service app once again.


17. Go to “Administrators” in the ribbon menu for the User Profile Service Application and add the DOMAIN\farm_account with “Full Control” rights
18. Start the User Profile Service in Central Administration [Central Administration à Manage Services on Server]
19. Start the User Profile Synchronization service in Central Administration [Central Administration à Manage Services on Server]
·         Use DOMAIN\farm_account credentials
This will take a few minutes… wait until it finishes the process and make the Services back to “Started” mode
20. Reset IIS
21. In service.msc on your Central Administration host server (i.e. “App Server”), verify the two ForeFront Identity Management Windows services
·         Services are started
set to startup “Automatic”
Running as DOMAIN\farm_account
22. Setup Profile Import [Central Administration à Manage Service Applications à User Profile Service Application - click on title]
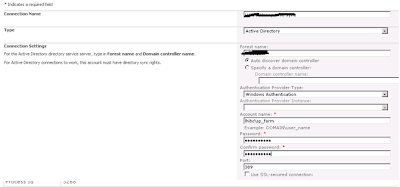
·         Click on the link “Configure Synchronization Connection” then  “Create a new Connection” [see examples below] 
·         Connection Name = “Test User Profile Sync”
Type = Active Directory
Connection Settings = dc.sub.domain
Authentication = Windows Authentication
Account Name = DOMAIN\ad_sync_account
Make sure your chosen account has “Replicate Change Directory” rights in AD
·         Click “Populate Containers”
·         Select the respective OU Containers which you wanted to populate in the user profiles
·         OK


23. Start Profile Synchronization
·         Central Administration à Manage Service Applications à “User Profile Service Application” à “Start Profile Synchronization” à Select the Start Full Synchronization radio button à OK
This will take a few minutes... Wait until you see the “idle” for Profile Synchronization Status on Manage Profile Service page.

24. Access the MySite with domain users and verify it’s accessible with all default user profile properties content.


Note: To get the content of all custom defined properties display on mysite, one must need to run the powershell cmdlet, because after a user profile application has been upgraded from MOSS 2007, single-string and multiple-string value properties are not available for use unless the Move-SPProfileManagedMetadataProperty cmdlet is run to map them to term sets within Managed Metadata Service.


25. To run this command. Open the SharePoint 2010 Management Shell

For e.g. Move-SPProfileManagedMetadataProperty
-ProfileServiceApplicationProxy
adcf3276-410c-4083-a925-d51f09b60e56 -Identity SPS-Memberships -AvailableForTagging -TermSetName Memberships

To know the profileServiceApplicationproxy associated with the user profile service application, run the below cmdlet and copy it from powershell console
Get-SPServiceApplicationProxy


Note : Move-SPProfileManagedMetadataProperty cmdlet has to run for all the custom defined properties to mapped to its term sets

26. Verify the custom properties data exist in user profiles for domain users [Central Administration à Manage Service Application à User Profile Service Application à Manage User Profiles]
Try the steps and let me know how it goes. Do not hesitate to post here for any clarifications.

Thanks for stopping at it!!!


Wednesday, December 1, 2010

View Duplicates option in search results page is not appearing in SharePoint site

I feel it’s imperative to share some notes collected while making view duplicates option available in my environment. While gooooogling, I hardly find any article which explains this scenario and at the same time, I do feel, it’s really need for an hour to help community users to overcome this problem by following simple steps.

Let me give you some inputs here to make you understand better, think for a while and go ahead and implement to see the desired functionality available to make use of.
A question here to understand how/when “View Duplicates” appears in the search result page.
How will be the duplicate document identified in search results?
Document similarity for purposes of identifying duplicates is based only on a hash of the content of the document.  No File properties (e.g. file name, type, author, create and modify dates) are input to this hash.  The MSSDuplicateHashes table in the SSP’s search database holds, for each document, all the 64bit hashes necessary to determine if one document is a near-duplicate of another.  This is read while doing a search if duplicate collapsing is enabled.

Here is my environment detail; I am running on Windows Server 2008 R2, obviously 64 bit platform with MOSS 2007 standard version installed. One Index server, one WFE and a SQL 2008 DB server. I have a site collection based on a blank site template with couple of document libraries where hundreds of PDFs uploaded in different levels of folders. I can say, a same PDF is been uploaded in 4 level of folders. In this scenario. If you made a search on any PDF, it is expected to bring a searched PDF in search result page along with an option down “View Duplicates”. When user clicks on view duplicates link, it should bring the four different URLs in the search result page. This is how, the search view duplicates functionality works. But, whereas in my case, the search is been pulled out with all four different URLs in a search result page without “View Duplicates” option.
Consider this workaround for only 64 bit OS.Also refer to the article here which explains the indexing PDF files in SharePoint. My notes are also collected from this article to make the view duplicates option available in search results.
These are the steps taken to get the View Duplicates option appears in the search result page.
1.    Install 64 bit iFilters in Index server(Ignore if the iFilters is already installed)
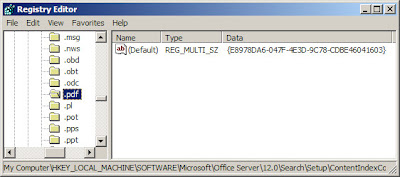
2.    Ensure the Data key for .PDF file type is as shown in below image.

Start à Run à Regedit à \\HKEY_LOCAL_MACHINE\SOFTWARE\Microsoft\Office Server\12.0\Search\Setup\ContentIndexCommon\Filters\Extension\.pdf

If you see the Data Key for PDF is different, then go ahead and replace the key as below
{E8978DA6-047F-4E3D-9C78-CDBE46041603}
3.    Reboot the server
4.    Initiate the full crawl on desired content source and wait until it gets complete.
5.    Search the PDF and verify the view duplicates option appears.

If you landed in a similar scenario, try the above steps and let me know how it goes!!
Feel free to post any comments you may have.

Tuesday, November 30, 2010

Failed to load the workflow in SharePoint Designer

 
Seems to be a common error find by the users and I think a simple fix around us to make it work. When you open a SP Designer 2007 to create a new workflow or to open an existing workflow, you may get a prompt to see this error “Failed to load the workflow”

Don’t be panic, try the step below
For Windows XP Users
Locate  to C:\Documents and Settings\<your user name>\Application Data\Microsoft\SharePoint Designer\ProxyAssemblyCache\
If you are running on Vista, a location is little different
C:\users\<your user name>\appdata\roaming\microsoft\sharepoint designer\proxyassemblycache
and delete (12.x.x.xxxx) folder. Then Open the SP Designer and try to create/open the existing workflow. If it works, good to go!! It is true that the above steps may not work all the time.
Otherwise, I’d assume that the possible cause of the error to make use of custom workflow activities within the workflow, because I landed in a similar scenario where I was trying pull out existing workflow with the custom workflow activities involved.
Before I directly jump on to the resolution, let me brief out the steps taken by me to see the prompt error message “Failed to load the workflow”. Just to know you, I have created a workflow with some custom user Profile activities by EdinKapic involved. I had to migrate the content DB of this application from one environment to another. I have added and deployed the EdinKapic’s solution then I successfully attached the Content DB. When I tried to open the workflow in designer to make the appropriate modifications in existing workflow. I see the error message “Failed to load the workflow”. I then decided to create a new workflow. When I tried to add custom activity from Action menu, nothing would happen. No errors either. It’s just like my selection of Action had No effect.  Believe Me! It really pulled my hairs.
These are the steps performed to get it worked!

1.   Make sure to check the custom solution is properly installed and deployed on respective application.
2.   Verify the assembly is GAC in SP Server and all WFEs (If any). Also check the assembly version and namespaces.
3.   Open the designer, find the Workflow XOML and open as a text file. Make sure the assembly version and namespaces are same as GAC.
4.   Open the web.config file to verify the SafeControl entries are properly fitted.
5.   Also make sure the AuthorizedType tag for each custom solution is present under <System.Workflow.ComponenetModel.WorkflowCompiler> section. In my case, I have a EdinKapic solution which you can find in below screen print. It is important to check the above entries in all the WFEs config file. If your web application is configured on any port and its Domain alias name is configured on port:80, make sure the SafeControl entries and AuthorizedType entries are added in port:80 web.config as well.
6.   IISRESET in all the WFEs.
7.   Finally Activate the feature, Open the CA à Application Management à manage Web Application Features à Select the desired web Application where you want to activate the feature à Activate the Feature.
8.   Open the designer and try to create/ edit the existing workflow. You should see the Custom workflow activities come over!!

If the above steps help you find the fix, then keep sharing the blog with your friends.
Feel free to post any comment you have!!

Wednesday, November 3, 2010

The update cannot be started because the content sources cannot be accessed

Event Type:   Error
Event Source: Windows SharePoint Services 3 Search
Event Category:       Gatherer
Event ID:       2424
Date:            10/22/2010
Time:            6:25:08 AM
User:            N/A
Computer:     <ServerName>
Description:
The update cannot be started because the content sources cannot be accessed. Fix the errors and try the update again.
Context: Application 'Search', Catalog 'index file on the search server Search'
For more information, see Help and Support Center at http://go.microsoft.com/fwlink/events.asp.


The update cannot be started because the content sources cannot be accessed. This error usually occurs in SharePoint index server with an event id:2424.One may have noticed that this error will occur when the search content sources was in progress and this will be repetitive in fashion, say in every 5 minutes.

Follow the steps below for a simple fix:-
1. Login with Farm account on MOSS index server.
2. Open the services console start à Run à services.msc
3. Right click on "Windows SharePoint Services Search" à properties
4. Click on Log on tab; make sure you have "This account" enabled
5. Click in "Browse" to select the same farm account.
Your logon entry will look like the below, "Log on As" changed from "<domain\FarmAccount>" before then change to "<FarmAccount@domain.com>" thereafter.


6. Click on Apply, and then say OK.
7. Finally stop "Windows SharePoint Services Search" service and restart it again.

Stay sometime in the server and verify the errors. It should be stopped by then!